Sunday, December 20, 2009

Christmas Tree Wall Hanging


Once again I saw something on someone's blog, maybe it was a pattern, or someone's picture on a quilting board, but I saved a picture of a primitive Christmas tree that I really liked. I I kept thinking about it - and the other day I decided I wanted to make it - NOW!! I'm impulsive like that..... to the right is the inspiration piece.


I discovered it was a tree in a Leisure Arts book of wall hangings. Since I didn't have time to get the book and get the wall hanging done, I decided to do my own style.

This is 30 X 11 inches. I first took a 26 X 7 inch piece of muslin and layered it over batting and muslin backing. I then sewed down 2.5 inch strips of the border fabric, flipping and pressing each piece in turn. This secured all 3 layers together.
Next I picked out several green pieces of scrap and applied Wonder-Under to each of the wrong sides. With a pair of scissors I cut random 'layers' of each and began layering them on the top. I also had a piece of tone on tone brown that I used for the trunk and bits in between the branch layers. I found a bit of gold to use for the star.


Once I had everything where I wanted them, I removed the paper backing of the fusible and fused it all down.


Simple and quick zig-zag machine quilting secured the pieces and accented the edges. My machine skipped and wandered in a couple of places but I left it - adding to the prim look of the piece.


I used gold metalic thread around the star.
Two bias strips of the border fabric were used in the upper corners of the back so it could hang easily.
Binding was cut and applied and it was finished!


Though I like how it turned out - I want to change it up some too. I think I might make a companion piece or two with some of the remaining pieces....maybe try to get closer to the inspiration piece.  Those will have to wait for now though....I've put off cleaning the house too long already!!


I couldn't help myself when I noticed all the small scraps of the above project - so I began cutting them into little pie shaped pieces and assembled them on another panel of muslin, fused, satin stitched them down and echo quilted them for this cute little mini forest.  It became a gift to my twin.


Posted by Picasa

Christmas Table Topper

I saw a show from Quilt in a day for a small wall hanging. Later as I was looking through some of my Christmas fabrics I found some Santa fabric that just called to me to be fussy cut. This is the result.

Most of it is machine quilted in the Quilt as you go style with gold metalic stitches through the 4-patches and criss-crossed in the middle square.

There are 9 pieces that were layered and quilted, then all were put together with the green sashing/joining strips. It was super easy to do. The 4 patches were made first - with the decorative stitches along the seam lines creating the quilting.

The Santa squares were centered on top of the batting and backing and the white frame was added via the stitch and flip method, then the corner triangles were added. I lost a tiny bit of the points on the frames, so next time I will make the frames a bit smaller to prevent this.

I think it needs a bit more quilting to help it lay good and flat so I will probably add some hand quilting too - but later. I'm thinking some hand quilting on the white frames around each Santa, and maybe even some squares inside each of the 4-patches.
Posted by Picasa

Sunday, December 6, 2009

12 days of Christmas


The 12 days of Christmas was an early tradition in my hubby's and our family. At the time, we had aunts and uncles enough that we each drew a name out of the hat and that was to be our part in singing "The 12 days of Christmas". Ages ranged from the 70's down to our youngest who then was about 6 or 8 years old. We had a lot of laughs as Aunt Eleanor, Uncle Buddy, or our young ones would miss their cue for their part, or even forget their part all-together. But each year we made it through and were only then rewarded with being able to open our gifts.


When I discovered that Nancy Halvorsen had designed this panel - well I knew I had to have it to remind me of our past tradition.


I am gradually embellishing the panels with crystals, beads, buttons and stitching, and imagine each year (for a while anyway) will be adding to this panel.

I have since discovered that Shelly Rasche has also designed a panel.  I may have to try to find that one as well.

Posted by Picasa

Saturday, November 28, 2009

Cell phone case from HGTV Pajama party


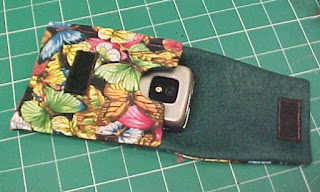
Posted by PicasaThe girls at the HGTV board had a pajama party last night and we made cell phone cases. I had a blast.  Here is the cell phone case that I made with the butterflies.  It fits the phone nicely and will protect it from those nasty scratches.    After I was done with that I still wanted to do something else and I'd been struggling with wanting to do another needle case for take along projects.  The second pic is the result.  I made the pocket only about 2 1/2 inches up from the bottom and put magnetic cards that I cut up from a larger sheet.


 These hold my needles that are threaded. I could fit cards of 8 - 10 colors. There is a folded pair of scissors under the tan needle flap held with elastic (extension of elastic holding the seam ripper). It all rolls up just right. The green felted material I used for the lining is a bonus thread catcher!! 

Friday, November 27, 2009

Nativity Backdrop


Ever since I got my Willow Tree Nativity set, I've had this piece in mind, wanting to make a backdrop for the set. Today I finished it. I saw a picture a year or so on the internet that gave me this idea. I'm sorry I can't give credit to whomever inspired me, but I want to Thank them all the same.


These are 3 different panels - They are basically envelopes with cardboard inserts to make them stand up. Two of the panels are just plain fabric. The Third is layered with various neutral fabrics cut to make houses or buildings representing Bethlehem.


These will sit on the shelf above the TV which is 51 inches across. By assembling them in panels, I can change where the buildings are, and with a different setting, I can have the background be anywhere from 19 inches across to 57 inches! You can see on the right hand picture where I've just taken 2 of the panels, and set them in a V - so the nativity figures can go right in the foreground.  Click on the photo to enlarge it.


I don't have my set out of the storage just yet, but I will soon and I will show you an update on how it all looks together.
I still want to figure out how to get the star of Bethlehem in there.....so I'll keep thinking on that.


My Willow Tree Nativity set is in place - I Love how it looks.

There's a great contest over at Piece N Quilt with more links to great holiday Ideas.  Click on the button below to see more.


Posted by Picasa

Friday, November 20, 2009

Twisted Table Topper


I've been working on this for a while now. I'm still so slow (or maybe it's because I've got too many projects going at one time). It's done enough to count now and I can show it. I enlarged the Twisted Table Topper enough to better fit my oak table. Each fabric is quilted differently, but all with the 'big stitch' quilting. I'm pretty tickled with it and wanted to share.

Update:  I've added some raggy strips around the center circle to give it more the appearance of the sunflower that I wanted.  I'm very happy with the results, but making a mental note that the batik I used for this didn't ravel quite like I expected.  Still a positive result.

Posted by Picasa

Friday, October 23, 2009

D9P Done!

Well, it's sure been a long time since I've updated this - I have been working on items as I can, but kept thinking I'd have something actually finished to show - and now I finally do! This is Brian's own quilt. It turned out 60 X 80 so it's plenty big for snuggling in the recliner or even stretching out on the couch and no cold tootsies!
I used warm and natural batting and a found flat sheet for the backing. The focus fabric was from Stuff n' Such http://www.stuffnsuchdowns.com/ and I knew I had to have it when I saw the woodworking print. The girls from the HGTV Quilting board helped me figure out the colors to put with it way back when.
This is the first time I've tried hand quilting with 'The Big Stitch'. I was experiementing, learning and discovering with this. I tried both with a large hoop and without, with 3 different threads, and several different sizes of needles. I found that I preferred using a hoop, a size 7 emroidery needle worked the best for me, and there really wasn't a lot of difference to me whether I used the perle cotton or the floss, but I much preferred the perle cotton on a spool than messing with the skeins of floss. I also learned there is a lot of variety in hand thimbles. Some I liked, most I didn't! I finally settled in on the Comfort Thimble that is the most comfortable for me.
Posted by Picasa

Sunday, April 12, 2009

I -Spy Alyssa

The core of Alyssa's I-spy quilt is now done as well.
I'm really happy how these two quilts have turned out. I was more consistent with the dimentional sashing of Alyssa's but many won't notice that unless you compare them side by side. Alyssa's quilt is different to that each block is different while Hannah's was done in pairs. I have enough of these blocks left that I believe I will make at least one more of these with left-over blocks. I really enjoyed this process and the results.

I still haven't decided how I will get them quilted. I have some information gathering to do. I'd better get going as I am starting to get these tops piling up!
Posted by Picasa

Double Irish Chain

I couldn't help myself! I was at Wal-mart the other day getting groceries, when I spotted these fabrics that called out to me! I love the brown and teal. They had several other prints that went with this, but I settled on these 4 thinking I could make the Double Irish Chain that I've been wanting to try. I had no idea how much of each fabric, but based on a previous project, I should get 2 yards each of the 'chain' fabric and 6 yards of the background. Here are the fabrics I got. I planned to use the dark, the floral and the background prints where they are placed here. I expected to use the teal that is similar pattern to the brown as a border.

Well, once I got everything home and started studying the pattern I realized I needed more of the lighter chain fabric. Here's what I came up with. I've got strips made up - ready to cut apart and re-sew. I will have alternating teal fabrics coming what I call the center cross of the brown. Maybe someday I'll learn to have the pattern first...then buy the fabric, but it seems that these fabrics just surprise me! I guess I kinda enjoy too that I can figure out how to make it work, and I think this will be a pleasing pattern - we'll see!
Posted by Picasa

Saturday, April 11, 2009


I found this wonderful sunflower panel that I just had to have.
We took it out to the shop and built a stretcher frame for it.
We lined the frame with some batting, and stretched the print on that - wrapping the fabric around the frame and to the back. The print was 24" X 44". There were stems that came down from the top from the previous panel, so I took a marker to darken them out. I may have to go back again after they dry with either more marker or maybe even some paint.
The print length was just 24" - and I didn't want to lose any of it top and bottom wrapping it around the frame, so I also added a strip of Kona cotton to both the top and bottom to give me room to stretch and staple.

We made the frame 24" X 37 - so we had fabric to wrap around the sides.
I haven't decided if it needs a frame or not. For now it won't have one - but we could easily add one later if we decide to. $6.95, some scrap wood and a little bit of batting and we have a dramatic print to fill part of that big empty space on the wall. It looks like it could use a whole lot more - I'll see what else I can do.
Posted by Picasa

Wednesday, April 1, 2009

I Spy Hannah

Many months ago I decided to make an I Spy quilt for the new grandbabies and got involved in a swap with the great gals at the HGTV Quilting message board. I did some trials of different fabrics and different methods. While I didn't seem to have a lot of trouble with the Y-seam if I was really careful, I did think the method with the half-square triagles work up quicker.

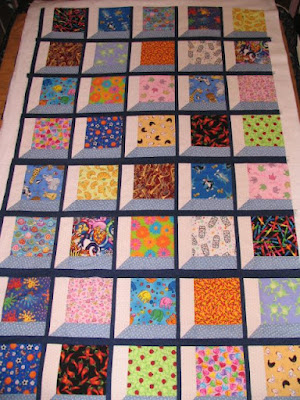
To give you an idea how long this has been in the making, I traded blocks on the board back in April 2008. I then shared the blocks with the Mikayla who picked out blocks for her daughter Hannah, and Megan who picked out blocks for her daughter Alyssa. These are turning out larger than I'd first thought, but I figure that will be just fine, and will be large enough for them to use for a long time.

Mikayla wanted pairs of blocks so they could also play matching activities. Megan chose having every block different. Both girls ended up wanting the same layout - so at least I didn't have to figure everything out twice! (Bless their hearts!)

I've been working on Hannah's quilt - after all - she is the oldest! While I had hopes initially to give the girls their I Spy quilts for Christmas of 2009, I've now decided more realistically that they should be for their 2nd Birthdays. Now I know their moms won't reveal this secret even if they do see this posting.....will you girls? I've still got a ways to go even on this first quilt, but I couldn't wait to share how it's coming along.

Can you tell from the picture where the matches are on Hannah's quilt?
Posted by Picasa

Monday, March 30, 2009

Britney's Monkey Quilt

Brittney loves Monkeys so I decided her quilt needed a monkey fabric. After finding some cute fabric with Monkeys, I started in on a quilt for her. Britt was the only one of the kids and grandkids that didn't have a quilt of her own. I managed to get her quilt top done by Christmas, but it still wasn't backed or quilted. This is a pattern from quiltville.com called Smokey Mountain Stars.

Once it was done I realized I need to focus more on the value of the colors. You can just make out the Pink and Green stars while the Blue stars stand out really well. Up close you don't get that, so I'm hoping she likes it anyway.
Since I had limited amounts of fabric left over for the backing, I decided to do the diagonal seam backing that makes the best use of the fabric - without one long seam down the center. I also had some little triangles left over from making the stars in the front, so I chained them together to make a band through the backing and another band of trim on the pillow.
This was the first time I'd done the no seam pillow. Once I figured it out - it worked like magic. Britt seemed happy with the finished product. I didn't realize she had a king sized pillow so I ended up adding more length to the pillow case. It was completed and to her in March of 2009.
Posted by Picasa

Brian's Carpenter's Quilt

I found some great material to make a quilt for Brian.
It was only $3.00 a yard so I got all they had left - 5 yards. I then got 1 yard each of 3 coordinating prints. The top red, the gray and the gold. After I got home I realized I probably should have gotten more of the coordinating fabrics, but decided to try to do what I could with what I had.


I made a few blocks of the Disappearing 9-patch then started wondering if I should really use the gray fabric that I got or another red that I had in my stash. I asked some great quilters at the HGTV quilting forum and the decision was made
to stay with the gray.


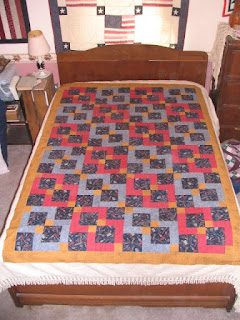
Here I am playing around with some layouts. I didn't realize there were so many ways to set this one block. You can see I'm still playing around with that second red here. I do seem to like the figure 8 pattern that is on the left. Let me see what else I can do with that.

Ah... I seem to gravitate toward the left side of this. I'm not sure what happened to the right - I guess I had some blocks turned the wrong way and didn't realize it before I took the picture.

I had enough of the gray and red that I'd bought with the focal fabric to make a decent sized 'snuggle quilt' for Brian.


This is progress along the way. I still have the top 2 rows (and one loner) to split and re-sew. I like how it's coming along. While the whole process is simple, it got a bit tedious with trying to keep the seams matched just right, trimming and squaring up each step of the way, etc....

I still had just enough of the gold fabric to add a border frame around the whole thing.


Then it was decision time. I had enough of the focus fabric to either back the quilt, OR add another border to finish off the top. After seeing the focus fabric layed under the corner of the quilt, the decision was made. It was again confirmed by the great quilters at the HGTV board.

I have a 5 inch border sewn on and the top is done just as you see it to the left. Now all I have to do is get it quilted. I still don't know if I'm going to try doing the quilting myself, or have someone else do it.


Posted by Picasa

Saturday, January 3, 2009

Well loved project

After making the (3) kids blankets, I made up a pillow case to have out in the living room. Hubby likes to take his naps out there and usually brings out one of the bed pillows from our bed. Now he can have a pillow that stays out. It has the same quilting and backing as the quilts, and finishes using up the rest of the star blocks.

Well you can see that our furbabies like the pillow too. Yes, they're spoiled (rotten). This is Remington - our English Setter enjoying an afternoon nap. It seems that if one of them isn't using the pillow.....

.... the other one is!!! This is Zepplin - Our Golden Retriever.

Grandpa's Shirts


I got on the blog bandwagon thinking I was going to keep current on my projects, particularly my new love quilting. Well shortly after my last post I started a secret project and that's literally all I've done since just about! During that time I also lost use of my camera - it just died. So while I can't show the progress of the secret project, I can show you the results.

This is one of 3 quilts I did for my children. The star and border fabric all comes from 12 different knit shirts my beloved Father in law used to wear. For the past several years since his passing- they have been sitting in a closet waiting for someone to make use of them. Last summer I decided I could use them, but in a different way.


The process was much longer than I'd origionally thought. I figured I'd cut up the shirts, sew them back together and be done! I had a goal of the end of October. Starting in June - that should have been do-able right? wrong!


I did start with cutting up the shirts, and using a fusible interfacing on the back of each piece that I cut apart. I went through yards and yards of interfacing. I set up a 6 foot long table with a wool blanket so I could fuse the pieces of a whole shirt at one time. Still it seemed like this first step was going to take a while.


The next step was to cut the largest square possible out of both the fronts and the backs of the shirts. I found the smallest piece, and the distance between the hem and placket on the front was 15 inches. I then cut this 15" square out of each front and back - 24 total. The rest of the fabric was cut into either 5" or 2 1/2" strips and set aside.


I drew an oversize star on a piece of butcherwrap and taped this to my cutting board. I then stacked about 3 of the squares at a time on top of that star, marking where the corners were and started cutting the lines. Then I had to put everything back together. Since I didn't want bulky seams, I cut another piece of fusible interfacing, reassembled each star on the new interfacing and put them back together - each one being different. After fusing the 2nd backing I secured each seam with a wobbly serpentine type stitch that connected both sides of the seam. I then took a piece of batting and my backing fabric and made a sandwhich. I figured out a pattern of straight stitching and 'quilted' each square with a walking foot on my machine. With some sashing to connect the stars and more puzzle piecing - trying to get the remaining shirt fabric to go as far as possible, I came up with the finished project.
There are actually 2 versions....the one above uses more of the shirting fabric and less of the red accent fabric. I was afraid I'd run out of the shirting, so I used more of the red. I like them both, and ended up having plenty of the shirting, so I guess the furbabies might get their own pillow yet! This last picture probably shows the coloring the best. Daughter has a better camera! All in all it was a wonderful experience, learning new things, problem solving, and just remembering a wonderful Father in law as I created these projects. An added bonus to all this is that I was using the sewing machine that had once belonged to my equally wonderful Mother in law (who has also passed) in making these creations. I couldn't have done it without them and I do miss them.