Back in January - shortly after I got that first baby quilt done, I looked at a whole sack of narrow strips of fabric I had been hang onto and decided to try another technique - String Quilting.
I started by shopping in my own stash and came up with some backing and all those strips. I really wish I had a picture of those strips in the beginning, because it was quite the mess! For several hours, I untangled, pressed and sorted a mountain of these strips that someone had no use for. I had picked them up at a local resale shop for virtually nothing, but they sat in my basement for several years too. I was finally going to do something with them.
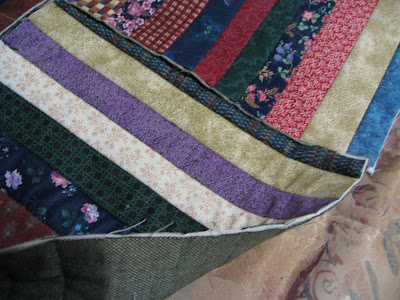
The above photo shows the front, back and that Warm & Natural batting in the middle. You can just barely see the quilting lines on the backing. This also presented a problem - I didn't know how to put the blocks together once I had them to this point. I trimmed them all to 11 inches square, stacked them all up in a neat little pile - and there they sat for several months.
Through a message board with HGTV, I absorbed as much as I could from a wonderful group of ladies. My sis (the one that made it possible for that first baby quilt to get done) had told me about this group of gals. They were fabulous! If you have questions about quilting - someone there will know the answers.
I put all the 11 inch squares together. Look at the above picture. I only used 15 of the blocks and set them 3 across and 5 down, using a small piece of black fabric to connect them. That only made this throw 33 X 55 and I knew it had to be much larger than that to be used. I'd been reading about a Braid technique - again using those scraps and quilting as I went, I made a long piece of 'braid to put next to those blocks. I didn't like making the braid as well as the blocks because you couldn't chain piece them. Each small piece of material had to be a seperate step.
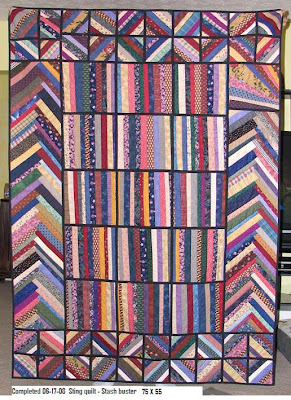
With the help and advice of those HGTV quilters, this is the final results. I absolutely love it - especially when you consider all but that little bit of black had been sitting in my sewing cabinet for years waiting to have something done with it. It's now complete 55X75 . I have to ask myself - Is there things I would change? - Yes But it's done and being used, and I'm tickled to have something for almost nothing. If I hadn't done something soon with that pile of fabric in that sewing cabinet - it was going to get tossed. A very win / win situation.
I started by shopping in my own stash and came up with some backing and all those strips. I really wish I had a picture of those strips in the beginning, because it was quite the mess! For several hours, I untangled, pressed and sorted a mountain of these strips that someone had no use for. I had picked them up at a local resale shop for virtually nothing, but they sat in my basement for several years too. I was finally going to do something with them.
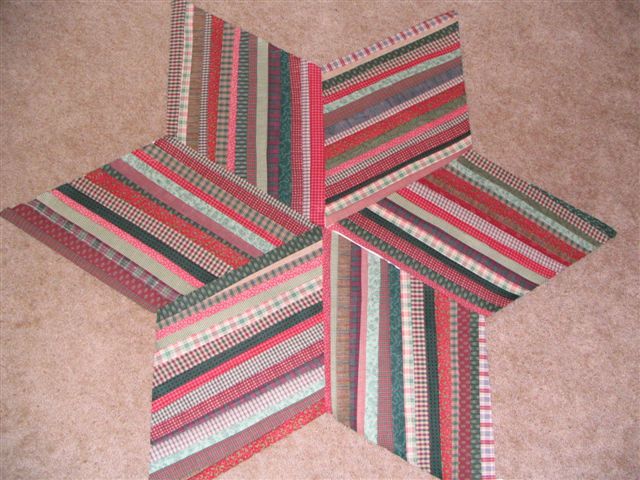
Impatient to get started, I grabbed several large pices of butcher wrap and cut out 60 degree diamond shapes and began sewing, flipping and pressing over and over again. Once I got all the diamonds completed, I trimmed them up and made a tree skirt out of these pieces. Now the coloring on this picture isn't right - the colors are much more vibrant than it shows, but I think you get the idea. I sewed this together - lined it with a large start cut out of a damaged chenille bedspread and now have both a tree skirt or a topper for my round oak table.
Let me tell you now - butcher wrap paper is NOT what you want to use for this technique! I had a heck of a time getting all that paper off once I was done with it. I'm learning as I go and this was a really big learning experience!
I wasn't satisfied with this one. I still had a whole lot more of those strings...and in the little reading I'd done, this was about the only way I was going to use these narrow pieces of fabric up.
I read somewhere that it doesn't matter how small your fabric pieces are - if you can make more fabric from them - they're still worth $7 - $9 a yard - and I still had several yards in that bag.
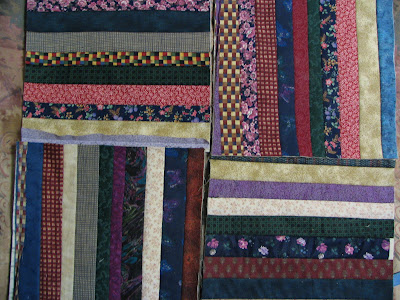
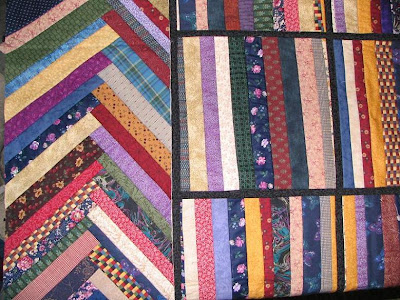
This shows some of the blocks and how I intended to put them together.I started cutting 12 inch squares of the Warm & Natural, the backing material that I still had plenty of and began strip piecing. Because I'd cut several of these, I could chain sew one right after another and only have to get up to press once all 16 of them had a new strip on them. It went fairly fast considering I was sewing and quilting all in one step.
The above photo shows the front, back and that Warm & Natural batting in the middle. You can just barely see the quilting lines on the backing. This also presented a problem - I didn't know how to put the blocks together once I had them to this point. I trimmed them all to 11 inches square, stacked them all up in a neat little pile - and there they sat for several months.
Through a message board with HGTV, I absorbed as much as I could from a wonderful group of ladies. My sis (the one that made it possible for that first baby quilt to get done) had told me about this group of gals. They were fabulous! If you have questions about quilting - someone there will know the answers.
I put all the 11 inch squares together. Look at the above picture. I only used 15 of the blocks and set them 3 across and 5 down, using a small piece of black fabric to connect them. That only made this throw 33 X 55 and I knew it had to be much larger than that to be used. I'd been reading about a Braid technique - again using those scraps and quilting as I went, I made a long piece of 'braid to put next to those blocks. I didn't like making the braid as well as the blocks because you couldn't chain piece them. Each small piece of material had to be a seperate step.
With the help and advice of those HGTV quilters, this is the final results. I absolutely love it - especially when you consider all but that little bit of black had been sitting in my sewing cabinet for years waiting to have something done with it. It's now complete 55X75 . I have to ask myself - Is there things I would change? - Yes But it's done and being used, and I'm tickled to have something for almost nothing. If I hadn't done something soon with that pile of fabric in that sewing cabinet - it was going to get tossed. A very win / win situation.
Very vibrant and colorful! I think the little grandbabies will LOVE it!
ReplyDeleteI love the string star. Did you use a foundation to sew the strips to? I have so may scraps I need to start doing something with them and I like this idea.
ReplyDeleteeverythingquilts - I did use a foundation to sew the strips to - but it was heavy butcherwrap paper! Let me tell you - that's NOT what you want to use! It took me forever to get that paper off. If I do this again I will use prewashed muslin or fabric that you wouldn't have to remove. Nina
ReplyDelete